Metallurgical Testing & Consulting Engineers


Silverdale. NSW. 2752. Australia
(Near Warragamba Dam -Covering Sydney Metro)
Phone: (02) 4774 1017
Mobile: 0419 498 115
This page last updated: 12/05/10
Metallurgical Testing and Consulting Engineers provide a non-destructive testing and advisory service to the high performance motor-racing industry. We also provide an in-house parts improvement capability including aerospace quality shot peening and cryogenic treatment. Our prompt and professional service ensures that our Customers can operate their business operations at a high level of confidence and reliability.
AUTOMOTIVE TESTING & SERVICES | CONTACT US | CRACK TESTING | CRYOGENICS | DRAG BIKE | FAILURE STATISTICS | LINKS | METALLURGICAL SERVICES | MISC SERVICES | PEEN REPORT | PROJECTS | SIDECAR RACING | JEDI RACING | SHOT PEENING
EXAMINATION OF PEENED CONRODS
This report covers the preparation and examination of three (3) only Toyota 13B engine conrods. This study was conducted in-house to compare shot peening source providers, and to determine any possible deficiencies in the processes performed at M.T. & C. Shotpeening (MTC). The study was initiated in response to claims that the appearance of the peened products was not as rough as was experienced with other shot peening providers. In the past this has continually raised doubts over the effectiveness of the peening treatment.
The conrods were supplied from a serviceable engine from an automobile wrecker. The parts were indicative of the strength levels of engine parts commonly tested and peened. The conrods were polished on the beams with 320 grit abrasive paper. The rods were then randomly submitted to the testing / peening service providers. The parts were checked for straightness and obvious faults prior to dispatch.
The conrods were forwarded to two service providers in the Sydney metropolitan area, with instructions to crack test, and then shot peen all surfaces except for bearing surfaces. One company (HDH) was selected for its reputation in the aircraft maintenance industry, and is governed by military and aviation approvals. The second company (BMT) was selected as an immediate competition to MTC in the automotive industry, and has broad recognition among motor-sport enthusiasts.
The MTC conrod was treated as per its standard procedures, based on the guidelines of specifications MIL-S-13165C and MIL-P-81985, the SAE Peening Guidebook, and the ASM metals handbook.
SURFACE EVALUATION
A quick visual examination indicated that significant areas of the conrods were subjected to 100% peening coverage as defined in MIL-S-13165. The BMT peened conrod was contaminated in tight corners with undersize, cracked and broken shot particles.
The extent of side bending was evaluated using a straight edge and feeler gauges. The surface roughness of the samples was determined using a calibrated surface roughness meter. Three additional conrods from recognised manufacturers were tested for surface roughness as a benchmark.
Ra Surface Finish, m .inch |
Bend over Conrod Length, mm |
|
| MTC peened conrod | 81 to 105 |
less than 0.01 |
| HDH peened conrod | 140 to 155 |
less than 0.01 |
| Carillo conrod | 100 to 125 |
less than 0.01 |
| Kryptonite conrod | 95 to 110 |
less than 0.01 |
| BMT peened conrod | 110 to 170 |
0.28 |
| Factory peened conrod | 200 to 328 |
less than 0.01 |
The BMT conrod revealed a broad range of surface finish values over the areas tested on the beam flanges. The result appears to be associated with over-peening operations, or plume flare effects. The thrust surfaces and sides of the main beam flanges revealed evidence of metal flow characterised as rollover. The rollover protruded 0.25 to 0.3mm from the corners of the affected surfaces.
The variation in surface finish on the factory peened / blasted conrod could be attributed to the mixture of as-forged and ground areas present.
The HDH conrod was covered in gear oil for rust preservation. The BMT sample was supplied in the bare, cleaned condition. The MTC conrod was coated in a light oil film for rust prevention.
RESIDUAL MAGNETISM
The residual magnetic field of the conrods was determined using a magnetic field strength meter. The results were as follows.
Magnetic Field, gauss |
Remarks |
|
| MTC tested conrod | 4 |
Demagnetised |
| HDH tested conrod | 6 |
Demagnetised |
| BMT tested conrod | 55 |
Magnetised |
Values of residual magnetism less than 8 gauss are considered demagnetised. The BMT conrod was not adequately demagnetised after crack testing.
METALLOGRAPHIC EXAMINATION
Sections of the conrods were prepared and examined using standard metallographic techniques.
The structures of all conrods were similar, and consisted of a martensitic matrix with fine dispersed carbides. There was no evidence of surface carburisation, or decarburisation.
The sample from BMT revealed a hard (1130HK) white-etch layer of fresh martensite on the little-end surface. The white layer was consistent with an electrical arc burn, resulting from poor electrical contact during the magnetic particle crack inspection process.
MICRO-HARDNESS EXAMINATION
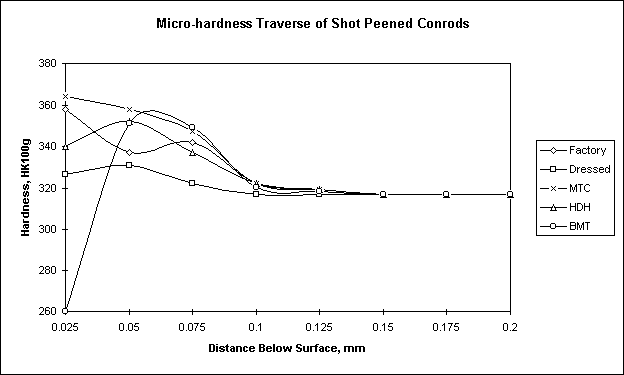
The micro-sections were subjected to a micro-hardness traverse to determine the effective hardened layer on the peened surfaces. The results are presented on chart 1, and are summarised as follows.
Maximum Hardness |
Hardened Depth, mm |
|
| MTC peened conrod | 364HK (37HRC) |
0.10 |
| HDH peened conrod | 352HK (35HRC) |
0.10 |
| BMT peened conrod | 351HK (35HRC) |
0.10 |
| Factory peened conrod | 358HK (36HRC) |
0.10 |
COMMENTS
The results are summarised in tabular form as follows:
Peening Provider |
Coverage, % |
Maximum Finish Ra, m .inch |
Bending, mm |
Magnetised Status |
Maximum Hardness, HRC |
Peening Depth, mm |
MTC |
100 |
105 |
<0.01 |
OK |
37 |
0.10 |
HDH |
100 |
155 |
<0.01 |
OK |
35 |
0.10 |
BMT |
100 |
170 |
0.28 |
Magnetised |
35 |
0.10 |
Factory |
100 |
328 |
<0.01 |
- |
36 |
0.10 |
The most significant observation is that all of the conrods tested revealed physical evidence of the shot peening processes. The shot peening process resulted in an increase in the surface hardness of the material from 31HRC core hardness, to over 35HRC near the surface. The hardened layer was measured to a depth of 0.10mm.
The similar hardness profiles of the MTC, HDH and factory peened conrods indicates that they were peened to equivalent peening intensities, and were aligned with internationally recognised procedures.
The BMT conrod revealed a significant drop in hardness at the surface, to below the core hardness of the material. The reduction in hardness of the BMT conrod could be associated with partial stress relief resulting from surface heating effects, but was not investigated any further. It is expected that this would be associated with a reduction in the effectiveness of the peening treatment. This effect was observed to a lesser degree on the HDH peened conrod.
The result of the shot peening process should be a uniformly dimpled surface. The roughness is determined by the shot size, peening intensity, and the portion of cracked or deformed shot in the charge. The MTC peened conrod revealed the smoothest surface finish of the rods compared. The finish of the MTC peened conrod was on par with the Carillo and Kryptonite peened conrods. The HDH peened conrod was only marginally coarser than the MTC peened conrods. The BMT peened conrod was the coarsest of the conrods tested, but was a significant improvement on the factory finish.
The BMT conrod revealed up to 0.3mm rollover. Rollover is an edge condition in which metal is deformed so that an edge starts to curl over the side. Careful manipulation of the shot stream generally avoids this condition. The condition is aggravated by high peening intensities using coarse shot. The presence of this condition on the thrust surfaces of the conrod would reduce side clearances, and would possibly result in premature failure of the bearings from friction-generated heat.
Non-uniform peening intensities over the surfaces of the part may result in an imbalance of stresses, and can cause bending in long thin sections. The BMT peened conrod exhibited bending of 0.28mm over the length of the conrod. In order to rectify the bend it would be necessary to re-peen the relevant surfaces, as normal straightening processes would reduce the effectiveness of the peening treatment.
The BMT tested and peened conrod revealed evidence of electrical burns and residual magnetism. This would suggest that there are procedural problems with the magnetic particle inspection process that are not aligned with accepted practice.
CONCLUSION
The conrods prepared, inspected and shot peened by M.T. & C. Shotpeening exhibited verifiable evidence of effective shot peening. The surface hardness of the conrod was increased from 31HRC to 37HRC, and the hardening effect extended to 0.10mm below the surface. A similar result was observed in conrods shot peened by other shot peening providers in the aerospace and automotive fields.
The surface finish if the MTC peened conrod was verified as being fine, but similar to the finish produced by conrods shot peened by other shot peening providers in the aerospace and automotive fields. The finish of the MTC, HDH, Carillo and Kryptonite peened conrods were notably better than the finish observed on the factory and BMT peened conrods.
All things being equal surface finish alone cannot be used as gauge to measure the effectiveness of the shot peening process. It is for this reason that the Almen gauge (refer SAE J442) is used as a means to measure the peening intensity and effect. Used in conjunction with meticulous monitoring of processing parameters, the process can be a useful means of consistently improving the fatigue resistance of cyclically load parts.
There were obvious deficiencies in the testing and shot peening procedures applied by BMT to the conrod tested.
There were no obvious deficiencies evident in the conrod tested and prepared by MTC Shotpeening.
The following chart summarises the hardness trends measured on the sections of the peened conrods. The HDH, MTC and factory peened conrods revealed similar hardness profiles. The reduction in surface hardness on the HDH and BMT peened conrods may be attributed to heat-related stress relief, from secondary blasting operations.
